
Tamiya M02L Build and Retro hop-up guide and Review Pt1
First though, a bit of history.
In the 90’s, Tamiya were riding a second wave of popularity thanks to their dominance of the RC on-road arena thanks to their innovative TA-01 chassis. Tamiya didn't rest on their laurels, and looked at other ways to grow their line-up.

In December 1994 they introduced the world to their M-Chassis. Unlike the TA-01 chassis these cars were 2WD, more narrow (160mm), and had three different wheelbases that could change the handling characteristics quite drastically. The M01 was their first m-chassis. A front wheel drive layout that sat under an iconic Rover Mini Cooper bodyshell that provided lots of fun.

It didn't take long before Tamiya released the next variant of the M-Chassis in Mid 1995 in the form of the M02. This shared a lot of similarities with the M-01 but provided a power through the rear wheels.
These models were huge hit. The lower price point, and Tamiya's vast array of licensing agreements ensured that the M-Chassis range would have on model that would appeal to just about anyone interested in trying out the RC hobby.
In 1996, Porsche released the
Boxster which was a new direction for the brand. A mid-engine configuration
with a completely new direction in terms of styling. In 1997, Tamiya released a
scale model that sits on the M02L chassis
I expressed an interest in r/c cars as a
child. Christmas in 1997, I was given a Tamiya 58197 Porsche Boxter M02L. This was my first hobby grade r/c
car. I had the chassis built by the evening. By the end of boxing day, my dad
painted/ mounted the shell and I was burning up the street with this car, doing
many runs & learning the skills. Unfortunately, I had many incidents &
crashed the car to a point of dis-repair, and as I moved into the world of racing I moved on and the Porsche was scrapped.
You always remember your first proper RC car, and I really wanted to relive the experience and build one again. Unfortunately the original cars seem to be very hard to find. Luckily a recent late night search on a Japanese auction site led me to a new in box car for sale. The box was a little faded but everything was there. I got all the pieces together to construct the car to relive my childhood

The box harks back to when Tamiya used illustrations instead of photos (Something they seem to be doing mNothing unusual in terms of how a Tamiya kit was prepared in the 90’s. The bags are clearly marked in the numbers necessary to complete the build.

They even include a postcard which is pretty cool, I forgot they used to do that.
Tamiya M-02 Upgrades
I never had the chance to upgrade the car when I was a kid. The car had bushings all through its life! For my new version I wanted it to be the ultimate example of a M-02. The problem was that the upgrades are getting harder to source but with a fair bit off effort it was not impossible.

- Kawada Universal driveshafts
- Tamiya 53234 Aluminium 4x65mm chassis screw set
- Tamiya 53070 Manta Ray Ball diff
- A pair of used Tamiya 53155 Low friction dampers


- Tamiya 53239 Front and Rear Stabilizer set
- Tamiya 53237 M-Chassis hollow carbon gear shaft set
- Tamiya 53238 M-Chassis quick-release battery holder
- Tamiya 53236 M-Chassis bushing set
- Tamiya 53253 M-Chassis aluminum racing set
- Tamiya 53205 M-Chassis M01 / M02 Universal Shaft
- Tamiya 53241 M-Chassis Aluminium Motor Heat Sink
Now it was time to start the build. I intend to fit machine screws where possible with hex head screws. I replaced the bronze ball ends with steel units which are black in colour. The steering arm joints were higher, but I had some spare TRF415 upper kingpins which gave the right height
First up is the differential. The standard kit comes with the classic unsealed bevel gear differential that is common in so many entry level Tamiya's. I swapped this out for the manta ray ball differential set.

Rear chassis

This fits the diff in the middle & the gears mounted on the outside in addition to the bearings, I fitted the gears with the carbon shafts just to make the drivetrain a little more efficient.


The suspension design is quite unusual on this chassis. The suspension arms pivot on springs within the pivot points, joined by a single damper. I’m guessing it cuts down on parts and the damper is longitudinal to lower the centre of gravity. However, a more conventional system of a damper on each corner would be more effective. Nethertheless, I built it up as per kit except the bushings in each suspension link to reduce play
The dampers I was going to use are the Tamiya 53155 Low friction units. These were one of the recommended upgrades for the M chassis. Although these are not the same as modern TRF dampers, they will still be more efficient than the friction dampers supplied.


Before you join all 3 parts of the chassis together, there is some work to do. The quick release battery holder was rebuilt as it was sticking. The rear stabiliser mounts need to be fitted before everything is joined together as they are secured on the inside. Securing the chassis was done with the aluminium 4x65mm screws


Electrics

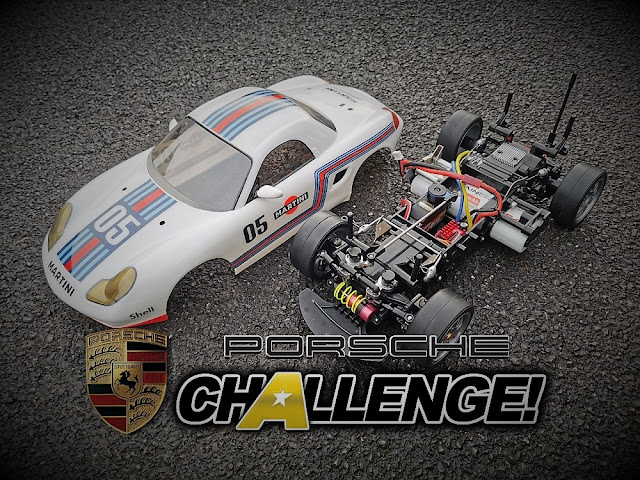
The servo was a kingmax low profile unit that I had spare. A hobbywing 1080 speed controller will power the HPI motor. The 1080 is cost effective and nice and small so I could fit in the chassis with no issues. I also fitted a SMD receiver to compliment the build. With everything installed I cut the wiring down to tidy it all up.

When I had the kit when I was young, my dad painted it for me in silver like the box art. I was planning on reproducing it, but fancied a race car theme. I reached out to Craggy designs & had a Martini scheme painted based on the Porsche race cars of the 80’s

For the pictures, I borrowed the wheels/tyres from the 911 GT1 in a previous build. Slick tyres suit a race car!
Conclusion
This was a great trip down memory lane. Everything except the roll bars fitted with no issues. Although I never fitted any upgrades originally, it was great to outfit the car with the parts I would now consider essential. Compared to a modern Tamiya M08, you can see that the cars have developed massively throughout the years.

It was great to build this classic from my now more experienced perspective after being in the hobby all of these years. Looking back, I felt like I ‘threw’ it together with no regard on how things really work. Although not a precision race chassis, it can be very easy to build the car incorrectly & not allow parts to operate as designed
What’s next?
I don’t plan to add any more upgrades as I feel that the car won’t benefit from anything else. I am looking to fit a rear spoiler to compliment the race car look, but I’m searching the right one.

I now need to give the car a track test once the weather improves. It would be nice to see how it fairs against other cars, maybe at the 2022 Iconic cup, who knows?


