
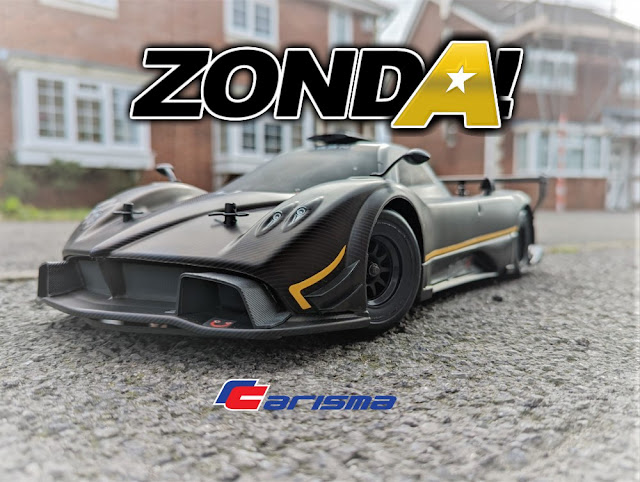
Carisma GRF-GT Pagani Zonda R Build and Review
Although I'm primarily a racer, I do have a soft spot for kit car that would look great in a collection. Sometimes they are based
on real cars I will never afford.
The Pagani Zonda R was a showcase to
demonstrate what the Zonda platform was really capable of. Every creature
comfort removed, big splitters & wings were added & big slick tyres
were also fitted. Unfortunately, it wasn't eligible to compete
in any race series around the globe. The same applies here . Although the
chassis is based on the CRF-F1, the shell would have to be swapped out for an
F1 shell with the wings to be eligible
Nether the less, I have always considered this a car that would sit in my dream garage. I saw this kit come up for sale & decided to purchase and build it. The plan is to see how it builds, then take it to a track at a race meeting during an open practice session, see how it fairs

This kit is a limited edition. Only 500 were produced worldwide. Although the bodyshell is available separately, only the carbon print will come with the kit. The main lower deck also has a production number laser etched on with gold print. You don't know the actual number until you open the box
Instructions
The manual looks to be laid out well. There are tips & notes about using thread lock on certain parts & building certain parts in a specific way. The only issue I found is the screw numbers listed don't match up in the diagram, They are a separate part number. Can be a little confusing when there are 8 & 10mm screws in the same step
Bag A
The manual states that the pivot balls need to be free in the cups when inserted in the arms. The cups are 8mm, but the holes are closer to 7.5mm. Gentle work with a file will help to elongate the holes.


To press them back out, I used a 8mm & 10mm internal diameter bronze bushings to press them back out in the vise to prevent damage.

The cups should be tight to fit with your thumb, but not that tools are required. This is a trial/error stage to get the right fitment, but it's not too much work to get everything to sit free
Bag B
Before I started this bag, I got all the bearings out of every bag to remove the grease.

I used my Kawada bearing cleaner with brake cleaner. I removed all the rubber shields from the front wheel bearings beforehand. I do 2 cleaning cycles. Fill the tub with 1/3 brake cleaner, put the lid on & give it a good shake. Once the bearings have dried out on some kitchen towel, I add a couple of drops of bearing oil to give a smoother bearing. For the ultimate friction free bearings, I could fit ceramic but I felt these were super free with just removing the grease


Upon to speaking to a team driver, he told me that most people ignore this step, but very important as it introduces reactive caster. Quite critical on a pan car. I sat there with a Dremel & removed as much as I felt necessary. Maybe a bit too much, but once fitted it caused no issues.

You can add/ remove shims on this block to adjust caster, a quick process
Bag C

The front hubs required a little work with a arm reamer to allow the pins to slide with little to no resistance.

The kit is supplied with 7k oil to lubricate the pins. A useful tuning tool to adjust the front handling. A decent amount is supplied, I used about 4 drops! Good for spares if I need thicker diff oil in my touring car. You don't want to have the oil dripping off, just enough the lubricate the pins.

The front end is coming together nicely now.

The turnbuckle plastic didn't look great in my opinion, there was some moulding flash that looked a little tricky to remove in case I damaged the ball end However, they cut perfectly square & once fitted, were perfect on the ball ends. I suppose looks can be deceiving.
Bag D
The ball diff is a tried & tested method for a pan car diff, it just works! I swapped out the kit supplied 48dp spur gear for a Xenon 64dp for the simple fact that I only use 64dp pinion gears. I don't even own any 48dp pinion gears!

Upon inspection, the kit is only supplied with 12 diff balls as the kit spur gear only needs 12, I needed 16 for the Xenon spur gear A quick message to Moodyfools & he sent me 16 ceramic diff balls. This will make the diff a little smoother as a result. I used my trusty Schumacher ball diff grease for the balls & associated black grease for the thrust bearing.

The thrust bearing sits in the axle in a case, an outer sleeve goes over to fit the wheel axle. This is good as you can change tyres without upsetting the diff settings, not as simple as other designs, but well thought out & impressive
Bag E
We now move on to building the motor pod & shock mounting points. Another recommend part from a team driver was to use 10mm posts rather than 2mm spacers on the side shock mounting points.

I sourced some posts from Zen racing. The ball studs were a little too long to fit a M3x 6mm screw on the other side as they were designed to use a lock nut on the bottom. I just cut 2mm off & had no issues.
Tip: thread a nut on the stud before you cut. Once done, it will cut the thread & saves any cross threading when you screw it onto the post

I used the kit recommend spacers on the rear axles as I won't know the ride heights until I have finished the car.

I fitted the rear wing mount to line the pod up & made even passes on all 6 screws to ensure it sat square. The best way I found to test is to insert the axle & spin it. If it's not square, the axle will be difficult to fit on both bearings & won't spin
Bag F
This is where everything starts to take shape.

The centre pivot is now fitted. This is an important part of the build. If there is any component that isn't free, the car will be horrible to drive. I assembled the pivot until the bolts felt tight, then backed off 1/4 turn at a time until the ball was free.

I slotted the 2 of the 4mm screws in the front holes to line the front chassis brace up just so I knew it was straight

The battery mounts caused a bit of a headache. Where I mentioned earlier that the screw numbers didn't relate to the diagram, this made this step tricky. Some of the mentioned screws weren't in the bags. In the end, I used some common sense & made sure the correct screw lengths matched up to the threaded bars.

The lower pod brace required a tiny amount of filing to fit. It's meant to be a tight fit.
I mounted the pod & set the pivot with no side bars connected. I was able to gain a feel where everything was before the bars interfered with the movement
Bag G
The side bars fit on, just a little adjustment to prevent any binding

Side dampers are a simple affair. The 7k oil is used again. I just put some oil in the damper grooves & compressed in the damper tubes a few times & wiped the excess off
The battery holder allows to tape the battery or use it to clamp the battery down. There is a lot of room to allow the right placement of the battery. I think taping will be the best way to go

The main damper is pre-built & filled with 35wt oil. It feels really smooth, so I've left if as it was for now.
Bag H
I used the recommend shims under the front end until I know where to fine tune it.

I am unsure why a turnbuckle isn't supplied at this step. Most servos won't sit the neutral point in the same position. I found a spare turnbuckle that was the same size as the bar in the kit. Unfortunately upon fitment, I found the turnbuckle was way too long & couldn't get the Ackermann link to sit neutral in the chassis. I found a much shorter one & was able to set the right length
Bag I
Wheels and tyres aren't included. You're free to fit whatever works best. It also removes any unnecessary cost & stuck with tyres that don't work.

I reached out to Speedrc & they supplied me with a set of GQ F1 wheels/tyres. Unproven in the UK as everyone uses the BRCA legal tyres, but these will do the job nicely. They are mounted on subtle black spoked wheels
Shims are included to set the recommend track
widths on the front. I tightened the wheel nuts until the wheels span freely
Bag J
You have a choice of standard low profile or micro size servos. Speedrc supplied me with a SRT M12 micro servo.

I have used SRT servos for many years with zero issues. The kit is supplied with an alloy 25t servo horn. I will change it to a servo saver if I run the car indoors

Although this car doesn't meet any race criteria at the moment, it can be easily converted for the F1 class. Looking through my electronics I have, I have the legal equipment. The Hobbywing XR10 stock spec esc is a nice little size coupled to a Surpass 21.5t motor. I had a spare RX-481 receiver which fits nicely. I still have some Silverback 5000 shorty lipos. Although a couple of years old, they should still hold up fine
You can use tape or the mounting to hold the lipo in place. I found there is a lot of movement, but there were a few fittings spare left over from the other sections. At the back of the chassis, there are 2 redundant holes, so I fitted 2 lock nuts to act as lipo stoppers

Some rewiring/ shortening & everything is ready to be powered up. I'm not 100% happy with the sensor lead, but I'll see what can be done later on. It's important that the motor & sensor wires don't cause any binding or strain on the rear pod otherwise it won't work as designed
Bag K

Not mentioned in the manual. However, it's full of spare nuts/bolts & other fixings in case you lose or break some during the build
Bodyshell

Now we have another special limited part, unique to this kit. Although the chassis is marked as the limited edition,
the body shell is a carbon print that's also only available with the kit. You can get
a replacement shell, but will only be clear & will require painting
Carisma also released a small video to help with completing the shell

The shell itself is
made of 5 separate parts excluding the spoiler. This was the best way to
capture all the lines & scoops. The spoiler is 5 separate parts that also
includes additional struts in the centre of the spoiler.


You also get some
plastic add on parts. Front brake ducts, roof scoop, side air intakes, front
canards & even exhaust tips. These are secured with screws & mounts
that need to be glued in place
This is a complex shell to assemble, if you've built a Tamiya TC-01 formula E shell this is in the same ballpark! There are lots of items that are tricky to cut out but I made a couple of passes with a sharp knife, then fold to snap off.

The carbon parts don't have the protective film
on the shell. Unfortunately, I made a couple of marks, mainly around the wheel
arches when I cut with curved scissors. It's not the end of the world, but it's
a shame that it's not 100% perfect. I sanded all the edges with 1000 grit sandpaper to smooth all the edges

To get all the parts to
be screwed on & lined up, there are a lot of holes that need to be drilled.
I would advise using a bodyshell reamer to get the best result. All the holes
except the mirrors were marked out with dimples. I had to make some holes
bigger to get parts to line up, but wasn't a big worry

The rear valance has
the exhaust mounts & also in the shell. It's worth checking the valance is
straight & see if they line up in the body. The front bumper has 2 holes on
either side for the canards. Again, just check & fettle the holes to make
sure it all lines up straight
The mirror positions
aren't marked, probably because there are on the fins. However, looking at the
diagram & pictures online, I figured out where they need to be drilled. You
do need to make a slot in addition to the hole. I used a file for this part


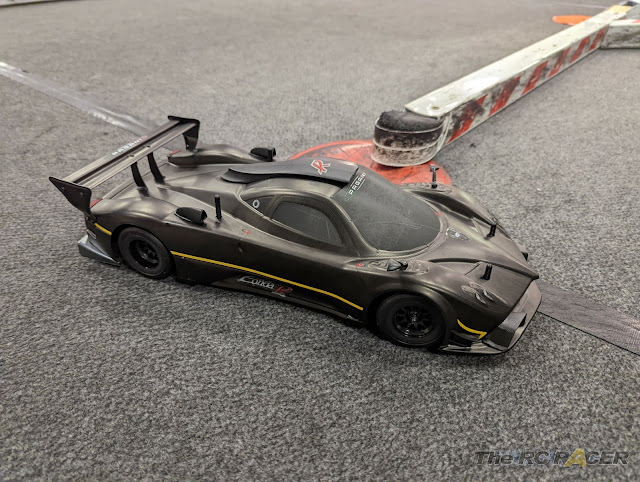

You can see a lot of detail has gone into this shell.
Overall
The Carisma GRF-GT Pagani Zonda was an
absolute pleasure to build. You can see this is a serious race chassis that
would be very competitive in the F1 class.

The shell is a work of
art & complements the chassis. Just take your time & your patience will be rewarded. It's a very close replica of the real thing

However, I wouldn't
recommend this kit to a novice. A pan car (F1, LMP etc) always looks simple, but its all about the fine details. Everything needs to be smooth & with minimal play. Some tools & procedures aren't explained unless you have some knowledge behind you. The Carisma UK team have been very helpful to offer setup advice & build tips if you get stuck at any point

The track test will have to wait for now. Like the real car, this chassis isn't eligible to race in any current race series. I may fit a F1 shell & wings, It looks great on the shelf, but would love to see how the Zonda goes on the track!
Moodyfools for the ceramic diff balls


