
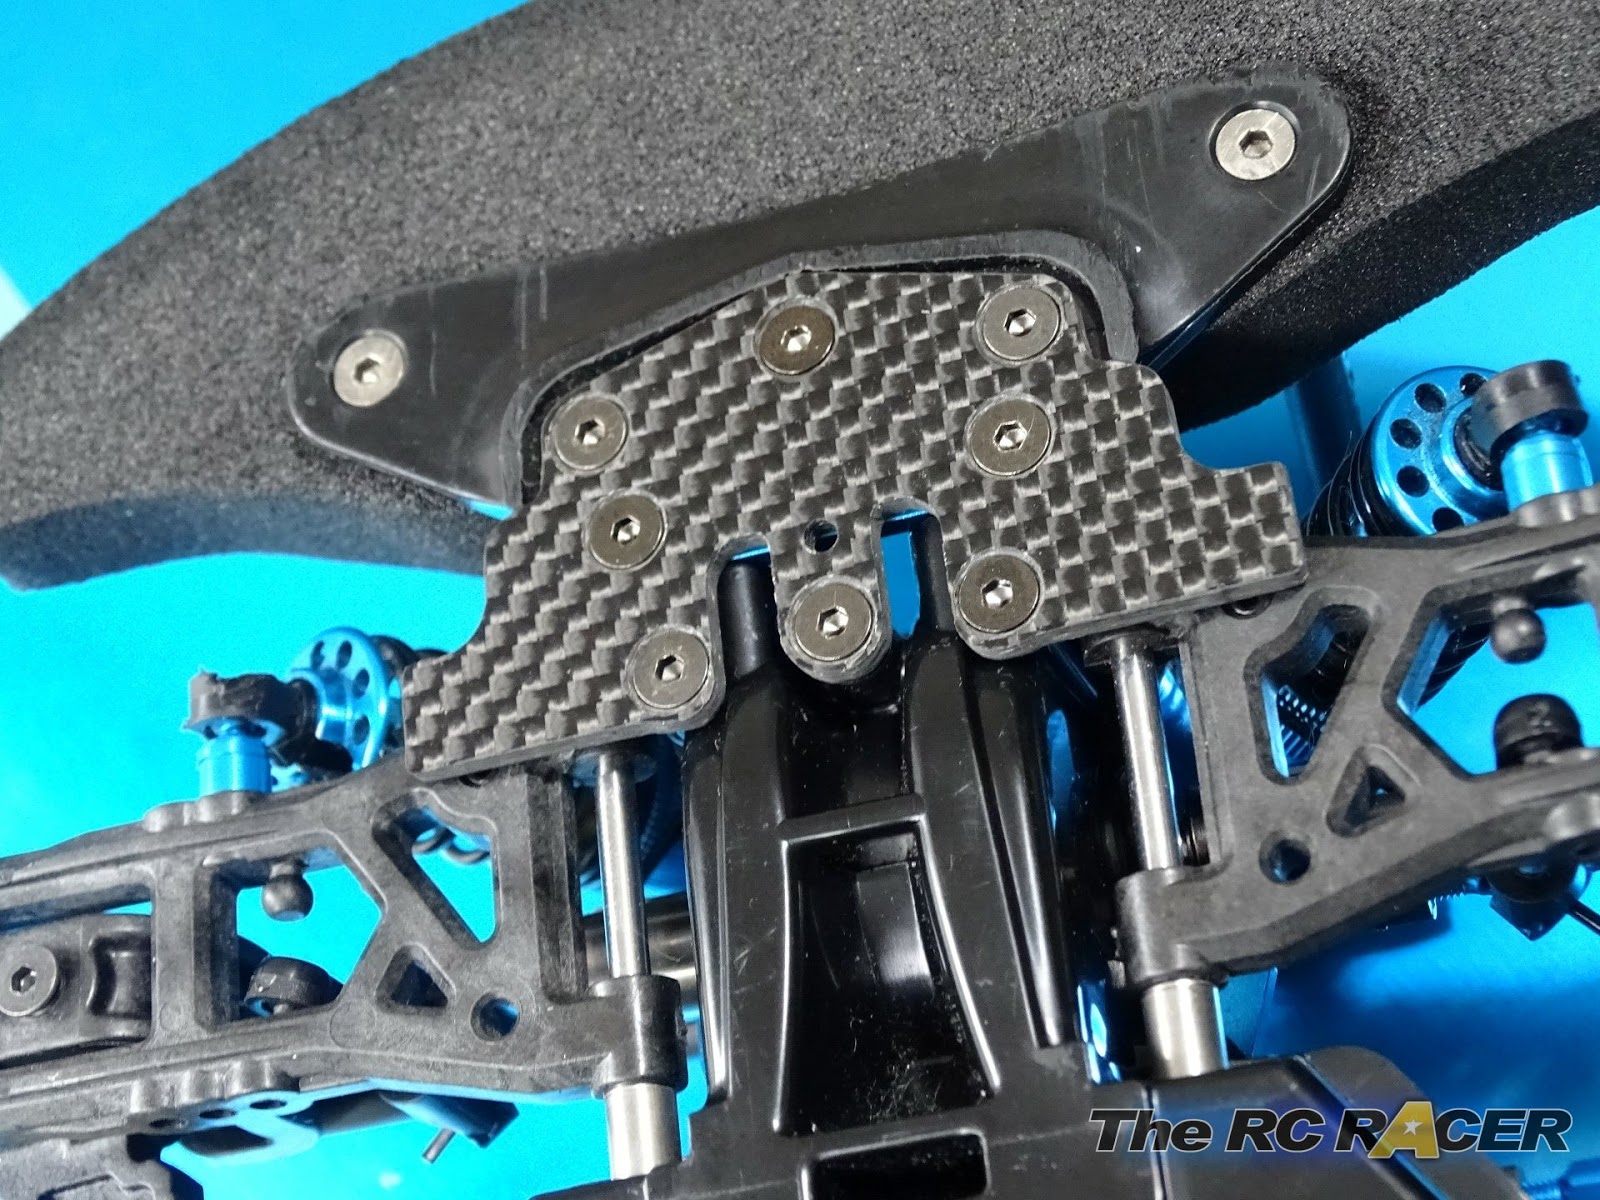
TheRcRacer Tamiya TT02-S Front plate
Now lets look at the front of the TT02-S, This new Front plate provides a great way to sort out the front droop, save weight (25g approx...
https://www.thercracer.com/2020/07/thercracer-tamiya-tt02-s-front-plate.html


Fitting instructions.
You need the following- 2 x 3x6mm CS screws (can be 3x8mm or 3x10mm if needed), to attach the Tamiya suspension block.
- 3 x 3x8mm CS screws to attach the plate to the chassis.
- 2mm spacer with a 3mm hole (Tamiya 53539 is ideal). (Not needed but good if you want to make the surface contact stronger)
- 1 x Tamiya 54880 Aluminum Adjustable Suspension Mount (XB). **Note** This block is needed as the inner front suspension holes are approx XD width.
- 5 x 3x10mm cs screws to build the bumper assembly and attach it to the chassis plate
- 2 x 3x10mm button head screws to secure the bumper via the top plate.
- 1 x Tamiya 51253 TB Evo 5 B-Parts (Bumper)
- 1 x Tamiya 54145 TB-03 Urethane Bumper


Now you need to build the front bumper. The Tamiya 51253 parts and 54145 are all you need. I used the optional Tamiya (54089) carbon bumper support for added bling (The plastic part is very similar weight). You need to use this instead of the TT02 bumper set-up, as that will not fit, there are also weight advantages.

Here are the build instructions for the bumper assembly from a Tamiya Manual. You do not need to fit the front bodyposts, although if you they are the same position as the TT02 front bodyposts (Or at least very close).

Changing the front arm sweep
As the block is adjustable you can select a range of front sweep. In reality I would not suggest you never go above 1 degree. I have provided a chart below. You can use the adjustable blocks, or the older suspension blocks if you have them at hand.
Front arm sweep makes your suspension bind as the front hinge pin is at an angle. This makes the front end stiffer. This is because as the weight moves forward the hinge pin is angled into the opposite direction of the corner. This delays weight transfer going forward but as the suspension binds it applies more pressure on the tyre, creating more traction and increasing your mid to exit corner steering.
- More arm sweep = less initial turning but more in the corner around the apex.
- Less arm sweep = More initial turning, less at the corner apex
Changing the Suspension pin height
With the Tamiya blocks you can also change the height as well as the width. This changes the angle of the suspension pin providing you with rear pro-squat / anti squat.

For lots more detail, on all of these settings and more, check the suspension guide I made here (Click link)
Weight Saving


Balancing the chassis

The front and rear plates have small 2.5mm holes to allow you to use pins to check the left / Right weight balance like a standard TRF car :
Overall
Over the standard part on the TT02-S you save a good chunk of weight and also can adjust some of the front suspension geometry.
It also provides the ability to use the droop screws without needing to purchase additional parts. Droop is an essential part of tuning, and you can now easily adjust it by changing the droop screws.
Oh and the end result is you have a nice Tamiya piece of blue bling. What more would any Tamiya fan need :)
Where can I get one? (AVAILABLE NOW!).
- The part is approx £6 (At time of writing this).
- The parts are available direct here : http://www.fibre-lyte.co.uk/
- Email sales@fibre-lyte.co.uk
- If you put this in the title 'TheRcRacer TT02-S Front Plate'
Help develop more parts
If you appreciate the non profit work I have done, please feel free to tip me to help me to afford to develop more parts. You can make a safe Tip by clicking this link https://www.buymeacoffee.com/TheRcRacer
Disclaimer and thanks
These have been made as a contribution to the Tamiya racing community. There is no profit for myself and the parts can be ordered directly via Fibrelyte. These are just a tuning aid, I found them to work well, as has others who have tested parts. Every track / driving style is different so do not expect a golden bullet.
Thanks to Steve at Fibre-Lyte
This is a simple part but was inspired by some of the amazing work Kevin Kreft has done on his TT02 Total conversion, which takes a TT02 and makes it look like an Awesomatix.
I have invested my own time and money in these parts for the Tamiya community, at no profit for myself. These designs are always helped via feedback from other racers. So please let's share feedback and set-ups and I can try to refine or design other parts in the future :)


Great site.
ReplyDeleteLove what you're doing with the TT02.
Question: what anti roll bars are you using on the front of this car?
Space between the shocks and gearbox casings is pretty limited and I'm struggling to find a bar the right width to fit in without interfering with the shocks.
Thank you in advance.
I think these are 417 roll bars. However very soon there will be another solution that will use the common 418 bars :)
ReplyDelete